Bathroom Reno - should we get pro help?
Leigh Hodge
7 years ago
Featured Answer
Sort by:Oldest
Comments (9)
Related Discussions
bathroom
Comments (30)So for this to work, you need to go back through my question and make sure you have answered all of them the best you can. Is the electrical outlet for the counter space going to be right next to the switch, or is it that blurred spot that I see in the picture, . If your walls are Travertine marble, and there are not already electrical boxes in the exact location the lights go, we are going to have a hard time. If a 30" vanity goes in the corner, and you leave 5" on each side for the lights, that leaves a 20" mirror with one light jammed tight into the corner. So if we leave another inch on both sides, for clearance, that leaves 18" mirror. If you put a 3" frame around the mirror mirror, that only allows for 12" of actual mirror. I don't think that is enough mirror. Your bath is too narrow for a mirrored cabinet with built in lights unless it is recessed into th wall. The plumbing is probably in the way for that. Give me your thoughts on what I have just said, and then go back and answer all my questions. Then we can take it from there with a narrower down and focused search....See MoreNeed help with designing my bathroom
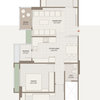
Comments (3)Or if you could attach a floor plan as a jpeg file you might get some general advice on layout ideas....See MoreRenovating a tiny( 4'2"x7'8") outdated bathroom.
Comments (53)I am so happy to see you here! I will have to go back and see if i can retrieve my posts... thought I would make them into a little book for my daughter, with photos. Quick run-down on the bathroom (not travels, no time) - The kitchen has a rather elegant sliding door with beveled glass panels. Painted white, since this was the original colour. GD's new bathroom has the doors I had picked earlier; i thought of polishing them but decided sprayed automobile paint (on a resin primer) would wear better. Especially since it is such a small bathroom, and she is so splashy. I have this finish in my kitchen and it has lasted 15 years now. A tad chipped here and there, but only needs a wipe down once a week. Same finish for the balcony doors, also split like the bathroom. We have a new wardrobe, a study table with built-in shelves, and a small chest of drawers for her odds and ends. I want to re-tile the tiny balcony, more as a little statement. Currently we are looking at Portuguese tiles, though I did think a mosaic with a funky cat might be nice. Let me see the costing. The room will be painted a neutral adobe, with bright white woodwork and an off-white ceiling. This means she can go wild with cushions and covers. Other changes in the flat; We have changed the glass in the master bedroom and living room from small cramped panes to a single pane for each section with a 1" bevel all round. Doubles the cost of the glass, but looks so elegant! The air-conditioning is being re-located. The compressors were all mounted in the bedroom and living room balconies, which looked terrible and meant the balconies (very narrow, only 30" deep) couldn't be used for anything. Not even plants. So they are being moved so that the compressors can be mounted at the rear of the building. two down, one to go. Now we can put in some nice plants, fishtail palms etc. The kitchen counter on one side came out intact and will be reused elsewhere. I am planning overhead storage, cupboards, and a draining cupboard for plates and glasses. Right now there is no dish washer, though a place is earmarked, but for now I will put in a cupboard with steel racks for cups, glasses and plates, all hidden behind pressed glass doors. This is all in the planning stage.... Pictures in a little while, they are mostly on my ipad and don't transfer well to the mac. They come without numbers... so I have to rename the or something. Somebody tell me how to do this!...See MorePlease help - Bathroom under-Sink cabinet
Comments (11)I suggest you follow the step-by-step guide for creating storage cabinets under the bathroom sink. Take proper measurements - Measure the available available space in height, width and height. Cut Plywood to size - With a circular saw and framing square, cut all the required pieces out. You can use a sliding compound saw as an alternative. Attach the base and sides - Start assembling the sink cabinets by placing the bottom piece of plywood sheet on a flat surface. Attach the back and top boards - Place the plywood sheet for the top part of the cabinet and attach wood screws to connect it to both the sides. Turn the back faces of the cabinet upwards. Keep the back piece over the structure and fix it into place with wood screws. Attach shelves - Place the cabinet in an upright position to install the shelves. Slide a shelf into the structure so it is flush against the back. Attach door - Keep both hinges of the door on the same side of the plywood sheet. Drill them using wood screws into place. Now keep the door over the cabinet structure, extend the hinges to one of the side panels and fix them to make them secure. Fix a hasp closure on the other side of the door, placing it in the center of the hinges....See More
User
7 years ago
Leigh Hodge
7 years ago
Sammy Elder