Renovating a tiny( 4'2"x7'8") outdated bathroom.
One of two in a top floor flat in a four-storey old building. It will have to be completely gutted down to the brickwork, new floor seal, new plumbing, new everything! It was last updated 20 years ago, with the exception of the commode, which is fairly new. We also plan to shift the door from the end, entrance from passage, to middle of long wall, entrance from bedroom. This gives us the chance to put in a longer vanity. The position of the commode and shower cannot be changed. We plan to reuse the commode, if it comes off the wall intact, and the shower glass. The window is tiny and will be enlarged, beams and columns permitting. Even then it will be dark as it is covered by a cement grille. Not having an architect's plan of the house we won't know just where the main supports are till we get the tiles off, though I could make an educated guess. The main user will be a teenager, but the room may be used as a guest room so bathroom cannot be too aggressively teen, no matter how much she wants it. I told her that bathrooms should last at least ten years, so consider a stye you won't get tired of. Genderless preferably, and not too dated. What I need most are suggestions for a genderless, non-dating bathroom that will make the most of available light.
Comments (53)

janbhan
Original Author9 years agoThis is the existing floor plan, very unimaginative and somehow cramped.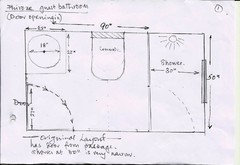
janbhan
Original Author9 years agoI like handshowers too, I have one with a big head that is perfect for our tiny shower. I sit when I shower these days, so it works very well.janbhan
Original Author9 years agoMy favourite bathroom remodel was for a five-bedroom house. One bedroom became the dining room, and its bathroom was merged with the master bedroom bath. That became the frilliest, most Victorian bathroom I have ever done all white and flowers. That was for madame. Hubby got a blue and white pinstriped tile with a terracotta floor inset with tiny squares of blue. He had told me he didn't want a feminine bathroom! The daughter's bath was turquoise blue and cream, with a seashell border tile. Again I put tiny turquoise tile insets on the 12" x 12" floor tiles. It also had a stained glass window! Two guest room baths had very different looks. One was sunny yellow and white with a fish motif tile here and there. It too got a stained glass window with a fish motif. Sadly the man who made these lovely windows has died, and I have not found a replacement. The other guest bathroom was in forget-me-not colours, pale blue-grey 12" x 12" tiled floor, white tiled wallswith a very fresh forget-me-not motif. All the bathrooms were planned with the occupants in mind; the forget-me-not bathroom is always used by the grandmothers, while the grandfathers prefer the fish bathroom. Bathrooms are fun to do because you can tailor them to the users, and since you don't spend too much time in them it's possible to go a bit outrageous: for instance, I just finished a red white and blue bathroom which in no way resembles a national flag! I look at convenience, ease of use, and safety, then start looking at colours and themes. Proper lighting is very important. Doors opening out are safest, and I have taken to using split doors because they don't take up so much wall space. I also like sliding doors if there is wall space available.janbhan
Original Author9 years agoI will once I get back home. Last 3 days have been really busy. All my pics are on the iPad and the desk-top, not on the Mac. which refuses to post pictures for me. But I will try again.janbhan
Original Author9 years agoI will use this for the walls, or may look for a matching but smoother tile. We have stalled on the ceiling, my daughter want a false ceiling, I don't because this already has low ceilings and I'd like to put in a small ceiling fan. Also it's a top floor flat and we need to look out for leaks from the terrace.
unwantedadvice
9 years agoJan, in my house we put ceiling fans in both bathrooms after a remodel. Love, love, love them. Both are very small. One from Lowe's and one from Hansen Wholesale out of California. They're just perfect so I think it's an excellent idea considering where you live.janbhan thanked unwantedadvicejanbhan
Original Author9 years agoWell we have had homes with bathroom fans, and homes without. I must say you do need a fan, such high humidity means the floors stay wet for a long time. And it is so much more comfortable! Still wondering why it is that I pasted the plan last time, and now I can't. one more try.janbhan
Original Author9 years agoNope. It didn't. So will have to wait till i get home to my big computer. we are still at my daughter's, having had a blessedly peaceful stay. No drums. Leaving today as my son-in-law is back and will take over baby sitting!janbhan
Original Author9 years agoToday I went to buy everything! All ordered except the granite for the door and window frames; I don't have the exact measurements. Tomorrow will put in the plans and the hoped-for layouts for the shower - there are four options, to use the 6" x6" tiles as a border in the shower and put the big blue tile in the middle, which i think will look best; lay a "carpet" in the shower with a cream border all round, and a few others which it is easier to post a picture than to describe. There will be a niche where the old door used to be, and we plan to use the same multicoloured tiles at the back. Glass shelves. A big big mirror to make it all look bigger! Work starts on Monday. more details tomorrow. And guess what - I lost this thread and had quite a hunt for it.janbhan
Original Author9 years agolast modified: 9 years agoToday the work started. Two workmen and a man who doubles as supoervisor and gofer.
They have worked with me before, so we started by looking at plans and drawings, and then inspected the site. They often have good ideas so I am waiting to see what will happen.
Surprise, when we lifted out some tiles on the false ceiling in the bathroom that is being renovated: the two bathrooms share a common wall...and the wall stops about 20" short of the ceiling!!! No sound proofing, and potentially no privacy - those tiles are delicately perched, to say the least. Now why? My contractor wondered if that partition wall wasn't supposed to be there, so tomorrow we will check the flat below. Maybe those two mingy little bathrooms used to be one? However we do need two bathrooms, so the gap will probably be filled by a lightweight aluminium frame and cement board, with fibreglass insulation in between. There is a case for false ceilings here because this flat is under a terrace and can get quite hot, but I will go for insulation and plasterboard right under the ceiling and forgo the recessed lights. Only one geyser serving two showers, that won't do either. We will have to put in a pressure pump for each bathroom or the showers are going to trickle. The chances of being boiled alive when the otherbathroom runs cold water is likely, so we will look at the plumbing arrangements tomorrow.
Careful measuring shows that my hope for a 36" wide doorway for the bathroom won't happen. At best it will be 30".. So doors will not be ordered until we know how much space we have.
The window can't be widened either. There are water pipes on one side and drainage pipes on the other. So I will try what i had done in anothr dark bathroom - put mirror tiles either side of the glass to bounce some more lght into the room. Also we plan to put in big mirrors along the back of the counter and adjacent wall. It will also bounce some light around.
Breaking the tiles and opening the doorway into the bedroom will start tomorrow. I met a committee member today and got verbal consent for the work to start. I followed it up with a letter to the Secretary detailing what we planned to do and how noisy it would be. However today's work was fairly quiet, as they dismantled the bathroom and also the wardrobe on the wall that is to be broken. Tomorrow they will take out the old door frame ready to brick up the opening. We are putting in granite frames instead of wood on the new door, so we get a little more space. Termites love damp wood but don't get anywhere with stone. Plus point.
One more thing today was to identify beams and columns, which cannot be cut into. I marked them on the plan. Also water lines, drainage lines and electricity lines...we are also opening up a lobby to enlarge the dining area a bit, and are not sure how the wiring runs. Tomorrow I'll make copies of all the plans, so they have a couple of sets on site. The contractor will come by next monday, but for now I am my own supervisor.
Another thing tomorrow: photographs!janbhan
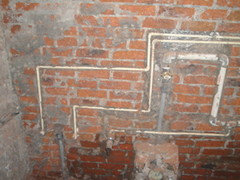
Original Author9 years agoLooking at the exposed bit of plumbing, find that in at least one place there is a section of PVC pipe attached to GI pipe... now this will not work if it's a hot water line because of differing expansions. Expect leaks in due course. So we will cut a few windows now the tiles are off to see if there is any more mix and match. PVC pipe is much cheaper than steel, and some plumbers will take advantage of the owner's ignorance - that is if the owner ever sees the work in progress! Phoned my contractor and asked him to check if he could, as I am busy for the next 2 days. The chief mason says he will call around lunchtime to tell me what he has found. I am most thankful that there are no pipes on the wall we plan to demolish! But plenty of wiring....
The door frame is still in place. It's nice solid teak, worth quite a bit. We will probably use it to make the frame for the Bison board that will fill the atrocious gap. I told them to remove it carefully. There is another one as well, so we won't have to buy much wood. The sections can be cut into two or four thinner sections. I like to repurpose materials where I can.
Took photographs, alas not the bathroom being renovated, but its mirror image on the other side of the wall. The boys got going much faster than I had expected, and by mid afternoon had removed the washbasin, commode and shower glass. As I left they were unscrewing the door and taking out the window!
This morning the floor was littered with broken tile. I congratulated them on their speedy work, and they treated me to tea...strong enough to curl your teeth, dark brown and super sweet. 50% milk, I think. I brought them biscuits.
Will download photos tomorrow.janbhan
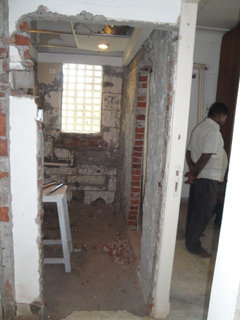
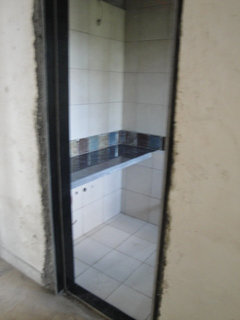
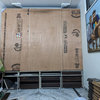
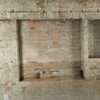
Original Author9 years agolast modified: 9 years agoThe photos took a few days, but now I have them. the first is my working drawing for the foreman to refer to. The second is the mirror image bathroom on the other side of the partition. it is in fact almost 9" wider than the other bathroom, but still cramped. The third shows demolition mostly done, with the plumber standing to one side to show the scale. It's a really narrow bathroom. We will use mirrors to make it feel bigger.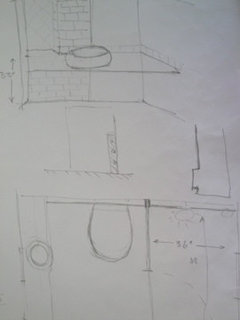
janbhan
Original Author9 years agoNotes on work at Phiroze - report on our discussion today.
(I'd welcome comments, this is the result of discussions with my contractor.)
Work done so far:
1)All the tiles have been removed from the bathroom walls and floor and the pipes exposed.
2)The bathroom door and outer bedroom door have been removed, as also their frames. The lock on the outer door was put onto the master bedroom door.
3)The new door into the bathroom from the bedroom has been opened up.
To be done:
1)The plumbing is ½” bore which is too small. Pipes will be replaced with ¾” bore. There will be a pressure pump common to both bathrooms to increase water pressure.
2)The geyser is now thought to be adequate for both bathrooms, and the main switch will be put outside the master bedroom door. The geyser will remain in the 2nd bathroom but mounted above the window. (For some reason the switch was in the OTHER bathroom!)
3)The door is likely to be a non-standard size, and since we want a double door it may not be available, even from Lakra Bazaar. Therefore doors will be custom made for this bathroom. They can have full length mirrors fitted on the bedroom side.
4)I suggest that we make a similar door (without mirrors) at the same time, to be fitted on the master bedroom bathroom door. This bathroom will not have any other work done for the time being.
5)The master bedroom bathroom will retain its false ceiling unless otherwise decided.
Masonry:
1)The granite counter will go across the width of the bathroom in front of the old doorway.
2)There will be a niche made in the top left hand quadrant of the original door, which will be paneled with the 6” tiles set diagonally. This will be about 4” deep and will have glass shelves. The back of the niche will be 2 slabs of marble glued together with smooth sides facing, rough sides out so that plaster and tiles will adhere. (This will be stronger than the original idea of using cement board.)
3)The extension behind the commode will be extended to touch the shower panel on one end and go under the counter at the other end. The ledge formed will be tiled to match the walls, ie, in Nitco Rustic 101.
6)The 6” coloured tiles will be used as a border above the ledge from the shower partition, continuing above the counter to the niche in the old doorway, and round the corner above the counter till the new door. (There will be no border in the shower, or on the wall outside between the shower and the new door.)
7)Tiles will go all the way up to the ceiling. The same tiles will be used on the floor and the walls. If the ceiling is uneven then we could put POP coving at the junction of wall and ceiling. Worst case we could also put POP on the ceiling.
8)The shower floor will have the coloured rustic 6” x 6” tiles. The big blue and silver tile will be set diagonally in the middle. The 6” x6” tiles will also be set diagonally with 6mm grouting. Unless we run short, there will be no border. Check that we have sufficient coloured tiles, can be ordered at 3-4 days notice.
9)Black granite will be used for the door, window and niche frames. The cut-off from the counter may be used either for the door-sill or for the window sill inside.
10)Where the floor has been disturbed in the dining room, the floor can be patched with new marble. It would be good to patch it so that it does not show, ie, the line could continue from one side to the other. At the moment we do not want to take up the flooring as this will be a major job.
11) Suggest ceiling lighting above shower (acrylic/aluminium strip box to hide geyser, pump and tube light), wall light above sink. What about a line of LED lights along the top of the mirror?
12)Position of switches: on the wall adjacent to the niche.
Wood work apart from bathroom doors will be discussed in the next report.
Photos show: new dining area opened up, skinny plumbing, suggested bathroom doors.

janbhan
Original Author9 years agoOh boy. Forgot about that! I routinely translate old colonial/Indian terms into US equivalents. This one slipped past the net.
I think the first geyser was a gas heated water boiler, British made, and called The Geyser. It then became generally used as a generic noun all over the Empire, then mostly died out, but lingers on in India. Water heater or boiler is what I think you would call it. Something like, the first ball-pen was made by Biro, which then became the generic term for a very long time. I don't think anybody calls it that anymore.
Our Indian geysers are electrically heated water heaters, generally quite small, enough for one good shower. They don't take long to heat up and are quite efficient. I have a tiny on-demand water heater in my kitchen, but those are not effective to use for a shower unless you also have a water pump. There are some very fancy water heaters now which are an integral part of the shower installation, including jets.janbhan
Original Author9 years agoUpdate on the bathroom:
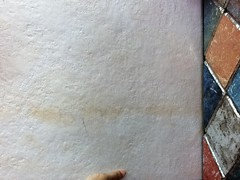
At the site, we have discovered a new problem - crooked walls, which were not apparent till we took out a door frame. From point a to point b over 3 ft is a difference of an inch. That will show as it will start almost in the centre of the wall and will show up as a shadow.
I told the workmen to knock the bathroom wall out completely and rebuild it to take in the deviation, as otherwise the door frame to the bedroom will get covered by plaster. I can see that cracking off in no time. One inch deviation over four feet is better, and won't show by the time we are done. There isn't much left of the wall anyway, might as well do it properly. We also decided to remove all the plaster from the back wall and redo it. The deviation shouldn't show at all once we are done. Sounds nit-picky, but I notice things like that and so does my daughter! It also means that the position of the original door won't announce itself with cracks later on.
Another problem - the bedroom door frame is a skinny one, which means that the door we took out was probably the original one, and the one directly into the bedroom is a later addition. We are changing both the bedroom doors anyway, but need to check the frames can take a solid teak door instead of a blockboard one, which is much lighter.unwantedadvice
9 years agoThanks for the meaning of the word geyser in India, Jan. that helps a lot.
Looks like you have a lot to do. Is there a timetable for completion yet? You do impressive work.janbhan thanked unwantedadvicejanbhan
Original Author9 years agoUpdate on the bathroom:
(Copy of a post elsewhere, I have so little time!)
I started today by looking at the wiring, as I wanted to take a picture of the route the electrician he had taken (so we don't drive nails into it later). I think this electrician is actually a taxi driver; he took the longest possible route (approximately twice the distance) to run wiring between two adjacent bathrooms. I took a picture of it, then took a bit of plaster and marked the route I thought he should take. Took another picture. Mailed it to my contractor with instructions to see that he did it my way, not his. Told the supervisor to do the same. Then I looked at the bedroom door, which needs to be moved forward 3" to match the door on the opposite wall. Also for trim to be put to cover the joint between plaster and wood.
Photographed the plumbing as well. Right now it is just channels cut into the plaster and brick; the plumbing work will start from tomorrow. But I will use these photos to make a diagram of how the plumbing runs, so nobody puts a drill into a pipe or a wire. Routing rather depends on the position of columns and beams, which you cannot cut into as it weakens the structure. So the first thing I do is to make a plan and mark columns and beams, which gives me some idea of the next steps. I also look at existing wiring and plumbing, particularly mains lines. Often these cannot be moved.
I maintain a little file of photographs of the work at various stages, and the home owner gets wiring and plumbing diagrams for future reference. The file includes paint colours (for re-ordering) and all the drawings, photographs and designs that were used.
The diagrams will be based on these photos, with accurate measurements. Once the walls are covered with tile and plaster it will be very difficult to remember just where they
all run.The photos I am adding now show the route for the plumbing, and for the wiring.
As for completion..well that rather depends on whether my daughter sticks to the schedule or keeps adding bits and pieces. I hope she doesn't. I hate mid-course changes in plans. I would say it will take another month to complete as per present plans. After that i am taking a break. Christmas coming up, I want to clear the junk out!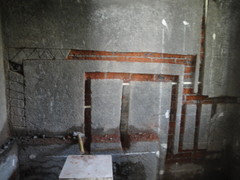

janbhan
Original Author9 years agoThe story so far - most of the tiles are done, just a bit above the door (waiting for the electrician) and the little niche as well. We predictably ran out of the 6'x6' tiles and had to order more... we are now at the stage of putting in doors and windows, and constructing built in wardrobe and bookcase. Some photos to explain:janbhan
Original Author9 years agolast modified: 9 years agoDuh. I forgot to add the photos. Clicked the wrong button entirely... dark blue counter in place, niche waiting for extra 6'x6' tiles, set like the shower, door and window frames (in black granite) ready for doors. That little niche is backed by a double thickness of rough marble, plastered the other side, waiting for tiles this side. Then it will get narrow glass shelves. Just wondering if i shouldn't have made provision for a little light in the top.... too late!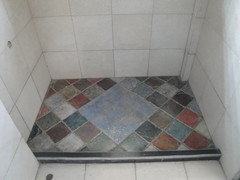
janbhan
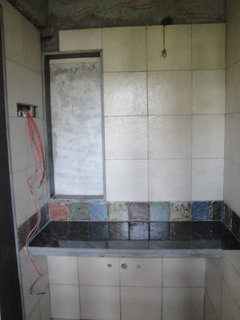
Original Author9 years agoThis might look a little dull, but once the silver washbasin comes in and all the shiny chrome fittings, and towels to match the coloured tiles...and nice lighting,,, it will look much better. Also everything is pretty dusty. Right now this has been shot by daylight as we still don't have power that side of the house. It will be restored once everything has been fitted and connected.
Next on the list: fitting water heaters in both bathrooms, fans ditto, lights ditto.
I need to shop...
For this bathroom, finishing tiling, fitting taps and mixers and the shower... still no consensus on the kind of shower she wants! I favour the big hand-shower on a rod, which is what I have and has worked well for me for the last 14 years! (Same old shower too, I just changed the head recently.)
We will reuse as many of the old taps etc as we can. My contractor told me that they just need to be washed in Harpic and they will come up like new! You live and learn. I never thought you could use toilet cleaner to shine up your taps! Not to be repeated too often, I would think.
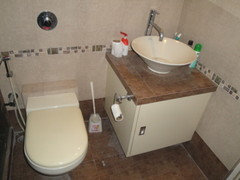
Last is to paint the ceiling and hang the commode. Using the original one as it was fairly new and in good condition. It is cream; the new wall tiles are also cream so it looks ok. It shouldn't look secondhand!
Next posting: repurposed doors from the famous Chor Bazaar in Mumbai. We have bought three... but the problem is getting the right size.
bungalowmo
9 years agoI just came across this thread. I really like those colorful square tiles you're using. Didn't read the entire post, but in the pics from last Friday...is that 1st one a shower area? With the colored tiles on the floor?? Totally cute! Reminds me of tiles I see here in the US, but in the Southwest...like Arizona & New Mexico.
Ole' baby!! :0)janbhan thanked bungalowmobungalowmo
9 years agoI finally replaced my 4 yo Moen tub/shower taps with a mix of old & older! Chrome plated brass beats out plastic any day of the week where I come from!!janbhan thanked bungalowmojanbhan
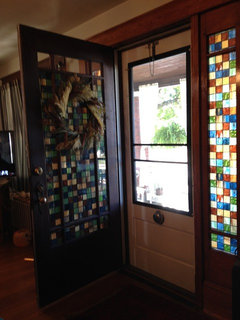
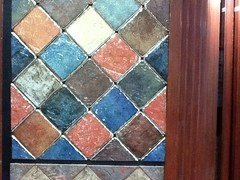
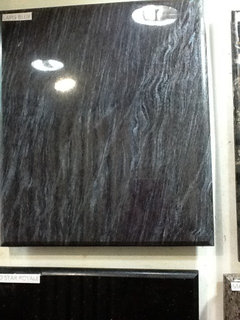
Original Author9 years agoYes, I like brass, and if the chrome wears off, just keep polishing. Here they say, old is gold. Old brass taps look good if kept polished, usually needs a weekly polish. The colourful tiles are from Italy, if you look back at earlier posts you will see they have an edging of silvery pewter which will pick up from the bling basin!
The wall and floor tiles are a rough finish ceramic tile from Nitco, an Indian company. Very reasonably priced - I usually do a mix of expensive (mostly for accents) and inexpensive local product.
I used the colourful tiles on the shower floor; the centre tile has silver highlights and was so pretty I bought it although there was only one...and then looked for something to go with it! see the September postings for clearer pics.
The shower is 33"x45", not very big but adequate.janbhan
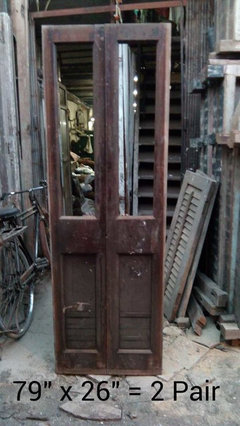
Original Author9 years agoSome door pictures: french windows with beveled glass, to be used for the kitchen (off the dining room); bathroom doors: french doors for bedrooms (we hope). all door from the old Lakda Bazaar in Mumbai where you can buy doors and windows salvaged from old buildings. Very cost effective! it is cheaper to spend some time looking for a door than to make it from scratch - all Burma teak or rosewood, beautifully made and in fair condition.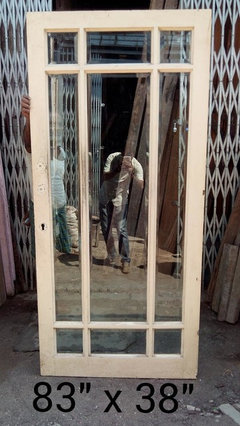

janbhan
Original Author9 years agoouch, got two of the same. Will try to get the right one this time! This is the door we will use for bedroom doors if possible; we need two, so I have asked my carpenter if he can add panels on either side so we get matching doors.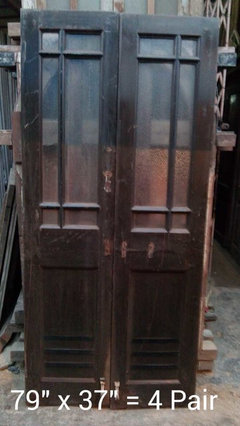
bungalowmo
9 years agoWOWSA!!!!! Those are some gorgeous doors!!!
Nothing like the old stuff. They're SO well made & have already lasted several lifetimes & will long outlast us too!
That first door in your pics....Lookin pretty familiar to me! Here's my front door! Before & after...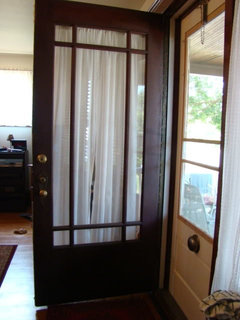
 janbhan thanked bungalowmo
janbhan
Original Author9 years agoyes, the white one in particular is going to be used for the kitchen doors. Two sliding doors. Most of these doors will be close to a century old.janbhan
Original Author9 years agoi was looking for the film you can apply to make windows opaque and pretty too... not sure it is available here though. I will ask my stepdaughter to see what she can find in California. Your doors are pretty - is that the same film I am thinking of? Also, is your outer door a screen door?
Spent a couple of hours with my daughter discussing the merits of the various doors. The bathroom doors are a no-brainer, and it is hard to get nice doors in that narrow width, so these are great. But a door for the kitchen was problem, until I suggested that she put the door off-centre and hung it on the kitchen side, where it can slide between the fridge and the wall. So that is the white one, and we will have to break the kitchen wall to create the right amount of space - both doorway and slide-way. Much discussion of study area for grand-daughter, who likes painting and needs storage and workspace, both generous! Finally we settled on something that would probably work; I will go to the carpenter tomorrow and show him the plans and get his input. He is an intelligent man and generally comes up with good ideas.bungalowmo
9 years agoYes, I put the film on my door & sidelights. Sticks on with a wipe of soapy dishwater!! The whole thing was done in 2 rolls.
My storm door is wooden with a 8-lite glass insert as well. It was here when I bought the house & I love it! I have already reglazed the windows in the one insert & had the screen part re-screened. I still need to strip the actual door & sand & repaint.
Here's a pic of the glass insert. This was before the repaint.
I look forward to seeing your project as it progresses! Got ya bookmarked so you're easy to find!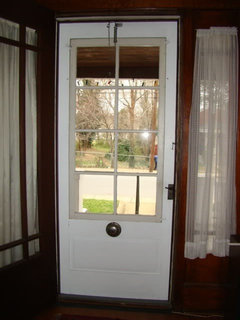
janbhan
Original Author9 years agoThis project is expanding. From renovating a bathroom to setting up a teenager's bedroom cum study. The bathroom is for the teenager too. Then on to renovating a kitchen apparently designed for a dwarf. The counters are set so low you could sit at them! I have been looking at doors for the kitchen, which currently has a very naff sliding door, a thin wooden frame and even thinner ply or that thick cardboard stuff. Badly hung too, it should have been hung inside the kitchen, and was hung outside, looks terrible. Not even straight. I wonder which cowboy did that job! My carpenter was tut-tutting and shaking his head. I will do you a better one, he said, then I showed him the picture of the white-painted door with the bevelled glass, and he said it would look much better (because see-through!) and started working out how to do it properly. He had done my kitchen door, which slides between the wall and the side of the fridge. No pocket because it will collect dirt and insects. It only needs a little grease once a year, and a cleaning of the hanging gear.
fissfiss
9 years agoHi Jan...architectural salvage has become so expensive here. Eldest DD just bought a couple of side lights for her "loft". She may just use them as art, but she loved them.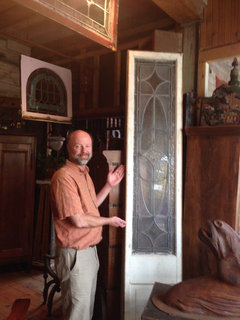 janbhan thanked fissfiss
janbhan
Original Author9 years agoThose are lovely. Mackintosh style, I love Art Deco, which is the keynote for much of old Mumbai. Your daughter could display them with diffused lighting behind. In any case I would advise putting a pane of plain glass in front as protection, leaded windows can be very delicate.
Here architectural salvage was only for those who couldn't afford new, or for those with a taste for antiques. It is now becoming fashionable, but only for those who can afford to remodel their homes extensively. I told my niece she should consider buying doors and windows for her next project BEFORE she started building so that we got everything the right size to begin with. Otherwise we waste time and money 'adjusting' everything.fissfiss
9 years agoJan, we did put rope lighting around an old window we used in the ceiling of our powder room in CO...and plexiglass, so that one would never be showered with shards whilst sitting on the throne! The other window of that pair hangs in a window to lock the view of the apartment house next door. They're not stained glass, it's a decal...my theory is that wear is uneven because the church ladies could not reach any higher when scrubbing.
 janbhan thanked fissfiss
janbhan
Original Author9 years agoI am looking at decals because I have to make the glass panes in the bathroom door opaque: one option is sand-blasting and putting a narrow bevel all round to give sparkle, but this will be expensive. So will leave it till last when we know how much we have gone over budget! I love the idea of rope light around the shower false ceiling, ours will also be plexiglass and I think it would look good. Quite tempted to give my teenager the option of changing colours for festivals!janbhan
Original Author9 years agolast modified: 9 years agoI have been travelling, but meantime work has gone on. Will post pictures of the progress, which has been slow because the flat is also being lived in; it is the overflow for my daughter's flat. She is swamped with visitors at present, and will be for another month! So far, the bathroom is almost done except for the mirrors and lighting. Putting a line of 6' deep drawers under the vanity, and mirror panels on the drawers. Beveled too, to add a bit of bling.... it is goings to look gorgeous, I hope. meanwhile the air-conditioning is being upgraded, and the kitchen work will start on one side. Flooring to be changed for portuguese tiles in the balconies. Now to rush off to the site to see what has happened in the last ten days!janbhan
Original Author9 years agosome pictures - tiles for the balconies, and the washbasin for teenager's bathroom.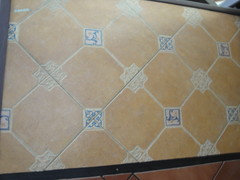
unwantedadvice
9 years agoHi, Jan! I am so happy you are back from your holiday travels. We were wondering when you would pop back into kaffeeklatsch. So sorry I had to close it but an immature troll flagged the entire thread and it gave me some thinking time while it was closed down. I decided better to move forward as an adult than play childish games. If another thread pops up where we can all get back together, I will most certainly give you a link. In the meantime thank you so much for all of your endearing stories on kaffeeklatsch and we will all meet up again soon. ~Djanbhan
Original Author9 years agoI am so happy to see you here!
I will have to go back and see if i can retrieve my posts... thought I would make them into a little book for my daughter, with photos.
Quick run-down on the bathroom (not travels, no time) - The kitchen has a rather elegant sliding door with beveled glass panels. Painted white, since this was the original colour.
GD's new bathroom has the doors I had picked earlier; i thought of polishing them but decided sprayed automobile paint (on a resin primer) would wear better. Especially since it is such a small bathroom, and she is so splashy.
I have this finish in my kitchen and it has lasted 15 years now. A tad chipped here and there, but only needs a wipe down once a week. Same finish for the balcony doors, also split like the bathroom.
We have a new wardrobe, a study table with built-in shelves, and a small chest of drawers for her odds and ends. I want to re-tile the tiny balcony, more as a little statement. Currently we are looking at Portuguese tiles, though I did think a mosaic with a funky cat might be nice. Let me see the costing. The room will be painted a neutral adobe, with bright white woodwork and an off-white ceiling. This means she can go wild with cushions and covers.
Other changes in the flat; We have changed the glass in the master bedroom and living room from small cramped panes to a single pane for each section with a 1" bevel all round. Doubles the cost of the glass, but looks so elegant!
The air-conditioning is being re-located. The compressors were all mounted in the bedroom and living room balconies, which looked terrible and meant the balconies (very narrow, only 30" deep) couldn't be used for anything. Not even plants. So they are being moved so that the compressors can be mounted at the rear of the building. two down, one to go. Now we can put in some nice plants, fishtail palms etc.
The kitchen counter on one side came out intact and will be reused elsewhere. I am planning overhead storage, cupboards, and a draining cupboard for plates and glasses. Right now there is no dish washer, though a place is earmarked, but for now I will put in a cupboard with steel racks for cups, glasses and plates, all hidden behind pressed glass doors. This is all in the planning stage....
Pictures in a little while, they are mostly on my ipad and don't transfer well to the mac. They come without numbers... so I have to rename the or something.
Somebody tell me how to do this!janbhan
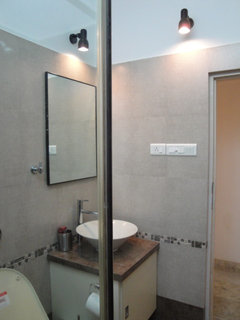
Original Author9 years agoPutting in a photo of the master bedroom bathroom, which has been renovated a little - lightbox over the shower, which means the whole bathroom has a good, even light, pressure pump to ensure a decent pressure in the shower (this is a top floor flat), new water heater, new lights... the rest is unchanged, and will not be done until the kitchen has been tackled. Next job. But you can see how boring this is, safe greige and dark floors. The lighting was terrible, false ceiling with one small light over the shower and washbasin. I tore out the ceiling, put in the light-box, and two spots (re-purposed from the sitting room) over the washbasin. They are black and ugly but serve the purpose for now. We plan a very funky and colourful bathroom when money permits.
Funny, this started out as just a bathroom refit, extended to the bedroom, and is slowly spreading to the rest of the house!
unwantedadvice
9 years agoHi, Jan! Just a quick pop in to give you the link to the new thread in the "other" category. I hope you had a good sleep. :) http://houzz.com/discussions/1354763unwantedadvice
9 years agoHi, Jan! I have been reading about the wedding festivities and it sounds very nice.
I am posting this link to another thread I thought you would be interested in as a writer. Enjoy! http://houzz.com/discussions/2753136janbhan
Original Author9 years agoI have dropped in to say that spray-painting of the cupboard and study unit is going on in the bedroom, so I couldn't take pictures of the bathroom as I wanted. The photos of the 'floating' mirrors are a bit fuzzy, but I must say they look great, huge mirrors, backlight by an LED strip all around. I am waiting for the painting to get over, and the installation of the glass shower panels and finally, the bling washbasin. Then I will take pictures of the complete bathroom, maybe a video. I am so excited about it.
The bedroom too is almost finished. Built-ins comprise a wardrobe, a small chest of drawers, and a study unit, all painted matte white. The walls are a subtle clay colour called 'basra pearl', and the ceiling is a much paler version of the same colour. The ceiling moulding is pure white. This very neutral scheme gives our teenager a chance to create any crazy combination she likes, and she likes neon pink, neon green, turquoise, deep purple - you get the picture. But I am hoping those very neutral walls will stop the room from exploding.
This part is almost done, but I will carry on with this thread, because what started as a bathroom has ended up as a total house renovation. We will move on the the galley kitchen, then the second bathroom, almost as tiny as the bling bathroom. This will have a different mood, because it is my daughter's, and she isn't into bling at all.


fissfiss