skip to main content
Photos
Photos
Kitchen & Dining
Kitchen
Modular Kitchen
Dining Room
Home Bar
Living
Living Room
Home Theater
Home Office
Staircase
Bed & Bath
Bedroom
Nursery
Kid's Room
Bathroom
Outdoor
Garden
Patio
Terrace & Balcony
Courtyard
More Rooms
Puja Room
Wardrobe
Exterior
Swimming Pool
View All
Find Professionals
DESIGN & RENOVATION
HOME IMPROVEMENT
Architects & Building Designers
Interior Designers & Decorators
Civil Engineers & Contractors
Design-Build Firms
Kitchen & Bath Designers
Landscape Architects & Contractors
Home Builders & Construction Companies
Photographers
Specialty Contractors
Furniture & Accessories
Flooring & Carpet
Tile, Stone & Countertop
Bedding & Bath
Advice
Stories From Houzz
Houzz Tours
Kitchen Guides
Bathroom Guides
Bedroom Guides
Decorating Guides
Outdoors
Architecture
Houzz Discussions
Design Dilemma
Before & After
Polls
Home Decorating
Kitchens
Living Rooms
Bedrooms
Dining Rooms
Exterior
Lighting
Paint
Building a Home
Houzz TV
Houzz Research
Cancel
Sign In
Join as a Pro
History of Houzz
BACK
HOME
PHOTOS
Photos
View all photos
Photos
Kitchen & Dining
Kitchen
Modular Kitchen
Dining Room
Home Bar
Living
Living Room
Home Theater
Home Office
Staircase
Bed & Bath
Bedroom
Nursery
Kid's Room
Bathroom
Outdoor
Garden
Patio
Terrace & Balcony
Courtyard
More Rooms
Puja Room
Wardrobe
Exterior
Swimming Pool
View All
FIND PROFESSIONALS
FIND PROFESSIONALS
View all pros
View all services
DESIGN & RENOVATION
Architects & Building Designers
Interior Designers & Decorators
Civil Engineers & Contractors
Design-Build Firms
Kitchen & Bath Designers
Landscape Architects & Contractors
Home Builders & Construction Companies
Photographers
Specialty Contractors
HOME IMPROVEMENT
Furniture & Accessories
Flooring & Carpet
Tile, Stone & Countertop
Bedding & Bath
ADVICE
Advice
Latest From Houzz
Houzz Research
Stories From Houzz
Houzz Tours
Kitchen Guides
Bathroom Guides
Bedroom Guides
Decorating Guides
Outdoors
Architecture
Houzz Discussions
Design Dilemma
Before & After
Polls
Home Decorating
Kitchens
Living Rooms
Bedrooms
Dining Rooms
Exterior
Lighting
Paint
Building a Home
Houzz TV
Houzz Research
ABOUT
COMPANY
COMPANY
About Houzz
In the News
Press Info
Careers
Contact Us
Terms of Use
Privacy Policy
Copyright & Trademark
EXPLORE HOUZZ
EXPLORE HOUZZ
Buttons & Badges
Mobile Apps
For Brands
For Professionals
Review Professionals
Suggested Professionals
CONNECT WITH US
CONNECT WITH US
Twitter
Facebook
RSS
PRIVACY & LEGAL
Privacy
&
Notice
Terms
Cookie Policy
Copyright & Trademark
SETTINGS
COUNTRY
COUNTRY
Explore Discussions
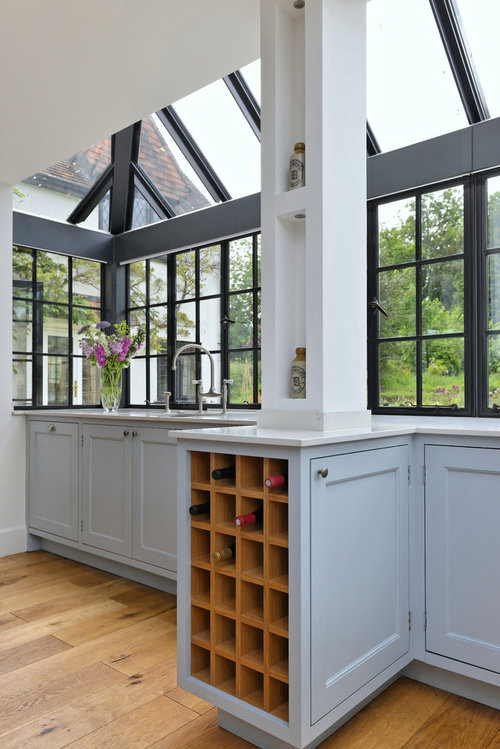
who made these windows?
natashawyss
5 years ago
TRADITIONAL KITCHEN, Surrey
·
More Info
Email
Save
Comment
1
Follow
Sort by:
Oldest
Newest
Oldest
Comment (1)
PRO
Vivid Line Furniture Ltd
5 years ago
I’m afraid I don’t know.
Related Discussions
Best Window Blinds
Q
Comments (1)
thank you for the history lesson :) this area is for questions.
...See More
Need help for Window treatments
Q
Comments (3)
HI -- I have the very same bay windows . I put Hunter Douglas wood blinds fitted to the windows and have hanging drape side panels on the side walls on each side of the bay . So nothing hanging in the middle . I have the panels ( 95 inch length ) hung from the full wall height (8 ft.) on a rod that goes across the width of the whole wall. Or you could just have the rod the with of each side wall ,having a finial on the interior ends . So that would be ,two small rods with 2 wall cup brackets and two finial ends . I am not a fan of the shutters because of the cost but mostly because they block too much of the light and view . Have the window blinds and the bay interior the same color .
...See More
door and window material
Q
Comments (0)
can anybody tell me what is fibreboard...i found out it is used to make doors and windows and can be made to have a wooden finish, is it better than wood ? is it cheaper than wood?
...See More
uneven door and window
Q
Comments (9)
1.Remove Door and Trim If you're adjusting an existing door frame in your house, first, you will have to remove the door itself and all of the trim surrounding the frame. The door is simple enough; just pull the hinge pins out of place, tapping them from beneath with a screwdriver and mallet if necessary. For the trim, wedge a flat pry bar underneath the edge on one end of a section, and gently pull the casing away from the wall. Do the same thing for all of the pieces around the door frame and carefully set them aside to reuse later. 2.Square the Opening Off It is difficult to ensure that a door will be level and square if the rough opening is not (the rough opening is the bare bones structure before any work is done to begin a door install). So, before you begin, use a carpenter’s square to check the upper corners. This will save you time and effort later on. Remember, the more accurate your measurements, the more level your door will be. 3.Shim Door Frame Placing a pre-hung door in the rough opening will give you an idea of how it will ultimately fit. This type comes complete with a pre-made frame surrounding it, so all you need to do is carefully slide it into place and shim wherever you need around the frame to level it in the opening. Remember that wooden shims can simply be made of wedges or blocks of wood. Place a level against the door frame in your existing installation to see where you need adjustments. Then, like before, place wooden shims until it sits as it's supposed to. To keep the shims in place, nail them to the hinge. Make sure you trim any excess pieces with a saw so they sit flush with the wall. 4.Get a Level Sill Next, adjust the door sill with a flat bar or wedge until it too is level. Place the wedge or bar under the latching side of the door frame and have your help hold your door so you can check to make sure whether the top of the frame, or lintel, will need more adjustment. 5.Double Check It is important in every project to double check your work. Take the time to measure the gap between the door frame and the original rough opening. Use and nail in more wedges where necessary. If you have the extra set of hands to spare, have someone re-measure if you feel it could be adjusted differently. 6.Secure Door Frame in Opening Place your blocks of wood and/or shims into the open space over the lintel, and begin attaching the door frame to the original rough opening. Again, double check each corner to be square, before completely securing it into place. Note: Do not worry about the finishing touches just yet. You can add framing to the door after applying the paneling or drywall. Also, head and side casings will finish off a new installation nicely, covering all your small shim adjustments. Thanks & Regards, Cathrinfrancis URBELITE Bangalore
...See More
Sponsored
More Discussions
hello . i live in navi mumbai and have a 3bhk flat
4
I have a wall storage and want to use it for TV unit
2
Need some ideas of ceiling
0
baseboards in the way!
15
Help needed in designing this wall
5
India
Select country
United States
United Kingdom
Australia
Deutschland
France
Россия
日本
Italia
España
Danmark
Sverige
Ireland
Singapore
New Zealand
India
© 2024 Houzz Inc.
COMPANY
About Houzz
In the News
Press Info
Careers
Contact Us
Terms
&
Privacy
Copyright & Trademark
EXPLORE HOUZZ
Buttons & Badges
Mobile Apps
For Brands
For Professionals
Review Professionals
Suggested Professionals
CONNECT WITH US
Twitter
Facebook
RSS
Vivid Line Furniture Ltd
Related Discussions
Best Window Blinds
Q
Need help for Window treatments
Q
door and window material
Q
uneven door and window
Q