8 Gorgeous Kitchen Cabinet Colour Palettes
Make your kitchen uniquely yours with painted cabinetry. Here's how (and what) to paint them

If you like the layout of your existing kitchen and your cabinets are in good shape, painting them can be a smart way to go. Another budget-friendly route is to purchase and install new cabinet boxes (or “carcasses,” as I’ve heard them called fondly) from a retailer, and then hire a finish carpenter to make door and drawer fronts you can paint yourself or have painted professionally. With custom-painted fronts, nobody will know your cabinets came from a big-box retailer.
It is a rather time-consuming process, but the money you save by painting cabinets yourself can be put toward that pricey quartz countertop you’ve been eyeing. We’ve broken down the steps below and included images of Houzz kitchens with gorgeous painted cabinets to inspire you — plus 8 examples of color and material palettes.
It is a rather time-consuming process, but the money you save by painting cabinets yourself can be put toward that pricey quartz countertop you’ve been eyeing. We’ve broken down the steps below and included images of Houzz kitchens with gorgeous painted cabinets to inspire you — plus 8 examples of color and material palettes.
4. Prime. You are now ready to apply primer. If you are going to be painting your cabinets a deep, intense shade, ask your paint retailer to add pigment to the primer to get better colour coverage with the final coat.
5. Sand, prime and sand again. If you want a super-smooth finish on your cabinets, or to ensure a long-lasting, durable finish, you may want to sand and prime and then sand one last time, using fine-grit sandpaper.
6. Clean. Make sure all surfaces to be painted are completely free of dust and grit.
7. Spray or brush on the paint. If you don’t own a paint sprayer, you can rent one from a home improvement or hardware store.
Be aware that spraying can be a messy business, and you’ll need to mask and cover anything in the room and adjacent areas that you don’t want covered with paint. Install plastic sheeting to close off other rooms in the house. Or simply paint using the highest-quality paintbrush you can afford. Use an angled brush for areas of detail, such as any raised or recessed panels on your fronts.
Note: You will want to apply at least two coats of paint. Semigloss is the best finish to use for cabinets because of its durability and ease of cleaning.
8. Install. Make sure the paint has dried and cured fully before attaching the fronts; otherwise they might stick to the boxes and cause the paint to chip off. (Installing plastic bumpers to the inside of your fronts can help prevent this). Check with your retailer or consult the paint can for estimates on drying and curing times.
Now for the fun part. Install the finished cabinet fronts and door hardware and admire your work.
Now for some inspirational kitchens, along with examples of paint and material palettes:
Inspiration Image 1
Example palette: Modern doesn’t have to be cold and sterile. Get the look of this cheery kitchen and a carbonised strand woven bamboo floor.
Inspiration Image 2
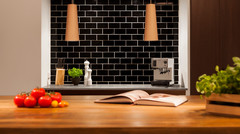
Example palette: I look forward to the day I get a client daring enough to go for black-painted cabinets!
Inspiration Image 3
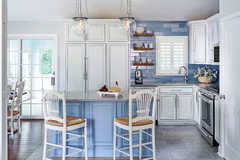
Example palette: Turquoise remains a popular colour for interiors.
Inspiration Image 4
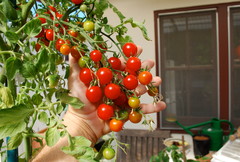
Example palette: Red stimulates our appetites, so it’s a fantastic choice for the kitchen. Paired with a muted dark green, it has a modern rustic feel.
Inspiration Image 5
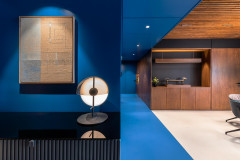
For those seeking a subtler approach to injecting colour in the kitchen, consider painting a bold colour onto the base, island or peninsula cabinets only, and/or painting the side and back walls of a niche.
For those seeking a subtler approach to injecting colour in the kitchen, consider painting a bold colour onto the base, island or peninsula cabinets only, and/or painting the side and back walls of a niche.
Example palette: Get the look: a ginger ale shade pairs well with stainless steel finishes and a cherry-stained oak floor.
Inspiration Image 6
I’m taking some liberties with my example palette below, as there is only a tiny bit of hot pink in this inspiration image, but I think this is such a fun palette. Obviously the key is to use one of the colours very sparingly as a decorative accent or via accessories.
I’m taking some liberties with my example palette below, as there is only a tiny bit of hot pink in this inspiration image, but I think this is such a fun palette. Obviously the key is to use one of the colours very sparingly as a decorative accent or via accessories.
Example palette: Try the autumn orange with a pink burst with a carbonised vertical grain bamboo floor.
Inspiration Image 7
Many folks are apprehensive about painting their cabinets a colour that is popular and trendy now, fearing that they’ll grow tired of it and want the next hip look, or maybe something less intense, in the not-too-distant future. That’s the beauty of painted cabinets — you can change the colour down the road without breaking the bank.
Many folks are apprehensive about painting their cabinets a colour that is popular and trendy now, fearing that they’ll grow tired of it and want the next hip look, or maybe something less intense, in the not-too-distant future. That’s the beauty of painted cabinets — you can change the colour down the road without breaking the bank.
Example palette: Pear green along with Celadon Green would look fantastic with grey countertops.
Inspiration Image 8
This inspiration kitchen demonstrates a great colour tip: if you want to use a neutral hue, such as grey or tan, consider using different shades of it. It will give the space more depth and interest without injecting over-the-top colour, if that’s just not your thing.
This inspiration kitchen demonstrates a great colour tip: if you want to use a neutral hue, such as grey or tan, consider using different shades of it. It will give the space more depth and interest without injecting over-the-top colour, if that’s just not your thing.
Example palette: Try silver and a glass shade with a floor in honey spice.
Read more:
What’s the Best Material for Kitchen Cabinets?
10 Indian Modular Kitchens With Personalities
Tell us: Have you painted your own kitchen cabinets? Share your experiences and photos below!
Read more:
What’s the Best Material for Kitchen Cabinets?
10 Indian Modular Kitchens With Personalities
Tell us: Have you painted your own kitchen cabinets? Share your experiences and photos below!
1. Prep. Remove cabinet doors and drawers and give everything a good cleaning with TSP (TriSodium Phosphate), or a TSP alternative, to remove any grease or dirt.
2. Patch. Fill in holes, dents or dings with a sandable, paintable wood filler.
3. Sand. Sand all surfaces to be painted with medium-grit sandpaper. Follow up with a good wipedown with a dry cloth to remove all dust.