You May Never Have to Buy These Plants Again
Once you have one, you can grow many more of these 10 popular plants
Marianne Lipanovich
29 April 2022
Houzz Contributor. I'm a California-based writer and editor. While most of my projects are garden-based, you might also find me writing about home projects and classical music. Away from the computer, I'm found in the garden (naturally), on my bike, or ice-skating outdoors (yes, that is possible in California). I'm also willing to taste-test anything that's chocolate.
Houzz Contributor. I'm a California-based writer and editor. While most of my projects... More
“New plants from old” might be one of the rallying cries of gardeners everywhere. These 10 plants are all fairly easy to propagate, giving you the chance to fill your garden or home with more of your favorites, or provide plants as gifts to friends and neighbors. There are numerous ways to propagate plants, such as collecting seeds and taking cuttings. If you’re new to this, start with these easy-to-replicate plants and go from there.
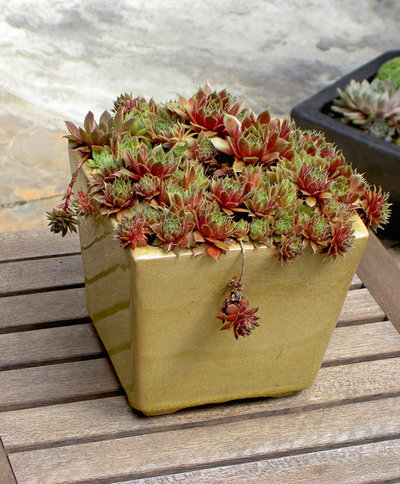
1. Hens-and-Chicks
(Sempervivum spp.)
This succulent’s common name is a tribute to just how easily this short-lived plant produces its offspring. New rosettes form on the outer edges of the mother plant, which dies off in a few years, often after producing iridescent blooms.
You can let the new rosettes of hens-and-chicks, aka houseleeks, spread naturally. If you want to plant them somewhere else, wait until the runner that connects them to the mother plant starts to wilt, then cut that and uproot the entire rosette.
Where it will grow: Hardy to minus 25 degrees Fahrenheit, or minus 31.7 degrees Celsius (USDA zones 4 to 11; find your zone), depending on species
Light requirement: Full sun to partial shade in hot desert regions
Water requirement: Low
Mature size: Varies from quarter-inch-diameter balls to 2 inches tall and 4 inches wide
Learn more about growing hens-and-chicks
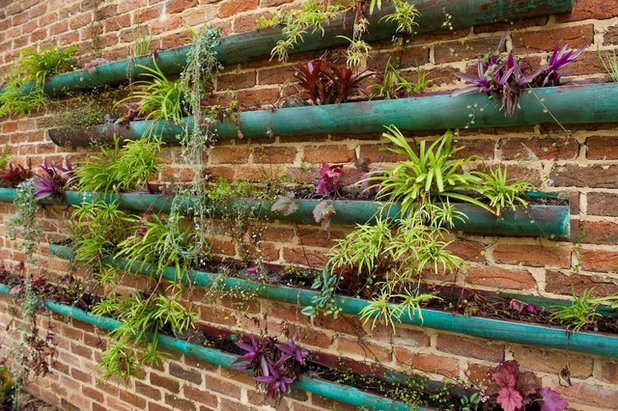
Spider plant with dangling plantlets in an Australian vertical garden
2. Spider Plant
(Chlorophytum comosum)
The ultimate hanging container plant, spider plant is known for its plantlets, miniature versions of the parent plant that hang down from the ends of the leaves. You can leave them in place to enjoy, or cut them away from the plant to grow your collection.
You can also get the babies started in a new pot next to the mother plant, even while they are connected to the mother and you are waiting for them to form roots. Keep the soil moist during this stage and remove the connecting stem when the roots have formed.
Where it will grow: Generally grown as houseplants but hardy to 20 degrees Fahrenheit, or minus 6.7 degrees Celsius (zones 9 to 12)
Light requirement: Prefers bright, indirect light but can take partial shade to partial direct morning sunlight
Water requirement: Regular; keep soil moist but not soggy
Mature size: 6 to 12 inches tall and 6 to 24 inches wide
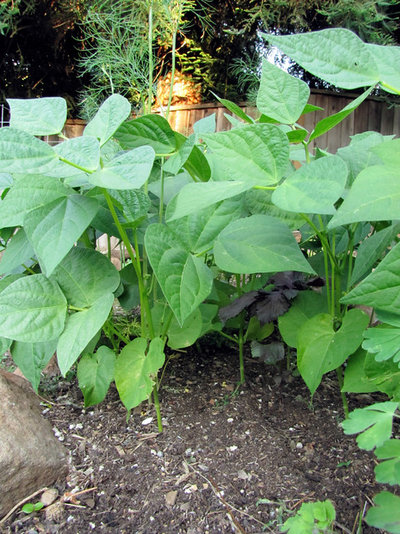
Bush beans in an edible garden
3. Beans
Collecting vegetable seeds for the next growing season in your garden or to give to friends is a time-honored tradition. If you’re a novice, collecting the seeds of your favorite bean plant is a good place to start. Choose heirloom and open-pollinated varieties, as hybrids are unreliable or may be sterile.
If you’re already growing “dry” beans, such as pinto and navy beans, then you’re set. The beans you’re harvesting can also be saved for next year.
For other types of beans, simply let the pods dry in place on the stalk or bush, rather than picking them. You may want to designate one or two plants just for this purpose, as once you stop picking, the plant will stop producing pods.
For all bean types, keep the pods on the plant until they turn brown and feel dry and papery.
Harvest the pods and let them dry another couple of weeks, until pressing a fingernail into the side of a bean won’t leave a dent. Remove the beans from the pod, separate out any chaff or debris around them, and store in an airtight container in a cool and dry location.
Where they will grow: Grow as an annual
Light requirement: Full sun
Water requirement: Keep soil moist but not evenly wet
Mature size: 1 foot to 20 feet tall, depending on type, and 1½ to 3 feet wide
Learn more about growing beans
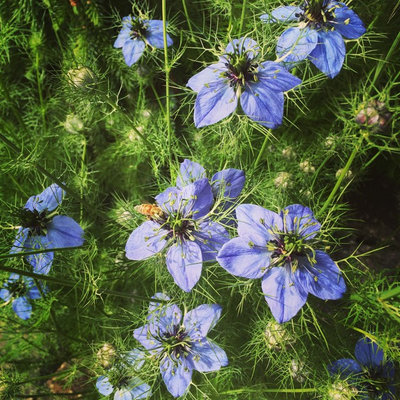
4. Devil in the Bush
(Nigella damascena)
Look closely and you can see the seedpods that look like little pouches below the blue-purple flowers. Inside are the tiny seeds of devil in the bush, also called love-in-a-mist. This plant readily self-sows, and the seeds are small enough that the wind will scatter them to all parts of your garden. The pods are also so numerous that neighbors will likely be happy to give you some as well.
If you want some control over where the new plants will emerge, gather the pods before they break open. Then let them dry a bit in a cool, well-ventilated place out of direct sun. Harvest the seeds by turning the pod over and shaking it. Shaking into a paper bag can help keep the seeds in one place.
Where it will grow: Hardy to minus 50 degrees Fahrenheit, or minus 45.6 degrees Celsius (zones 2 to 11)
Light requirement: Full sun
Water requirement: Moderate to regular
Mature size: 8 to 36 inches tall
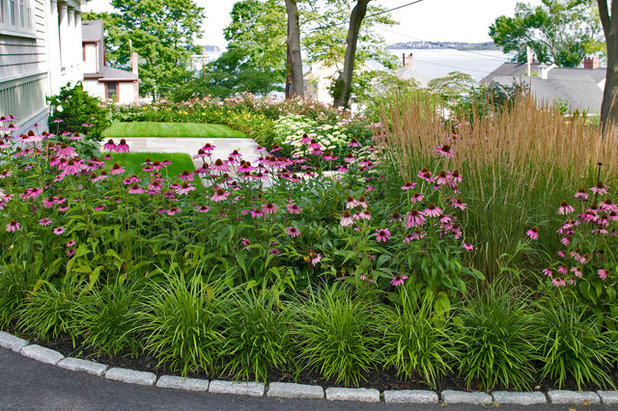
5. Coneflower
(Echinacea spp.)
Like many of the other native prairie plants they like to mingle with, coneflowers are happy to spread on their own. But if a plant is outgrowing its space or you’d just like to add more to a specific garden location, dividing is the way to go. It’s also a good choice when the center of the planting is beginning to look bedraggled or has died off. Usually, coneflowers need to be divided every three to four years.
Start by digging up the entire plant, including the entire root system. Remove the soil from the roots, either by hand or with a light spray of water, and cut off any unhealthy roots.
Gently pull apart the plant to form new divisions, taking care to keep the root system in each division intact. Err a bit on the cautious side and don’t divide too heavily — sections that are about 2 to 4 inches in diameter are ideal. Replant as soon as possible, either in your landscape or in pots, then provide water and keep the new planting area moist until the plants settle in.
Where it will grow: Hardy to minus 40 degrees Fahrenheit, or minus 40 degrees Celsius (zones 3 to 9)
Light requirement: Full sun
Water requirement: Regular; can handle some drought when established
Mature size: 1½ to 3 feet tall or taller and 1 to 3 feet wide
Learn more about growing coneflowers
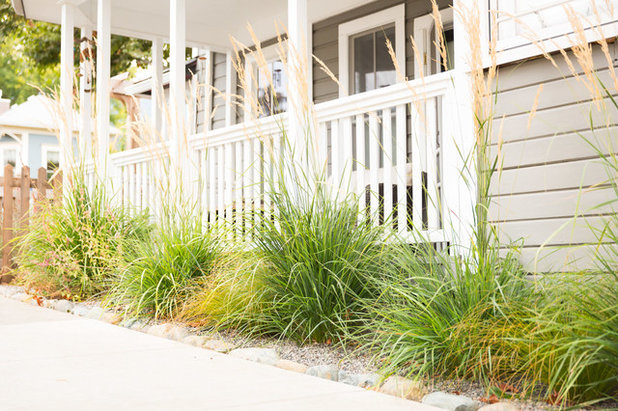
6. ‘Karl Foerster’ Feather Reed Grass
(Calamagrostis x acutiflora ‘Karl Foerster’)
Almost all ornamental grasses can be easily divided, and ‘Karl Foerster’ feather reed grass is no exception. Break it up to add to different spots throughout your garden or when it’s starting to outgrow the space.
The grass grows out from the center, so you’re likely to end up with a dead spot in a few years. Divide in spring or fall. You can either dig out the entire plant or leave one section in place. Uproot the plant, keeping the roots intact. Remove the soil from the roots, either by hand or with a light spray of water, and cut off any unhealthy roots.
Pull the divisions apart or use two spading forks or a spade to make the cuts. Replant as soon as possible, water well, and keep the soil moist until the new plants are established.
Where it will grow: Hardy to minus 30 degrees and possibly to minus 40 degrees Fahrenheit, or minus 34.4 degrees to minus 40 degrees Celsius (zones 4 to 9 and possibly zones 3 to 9)
Light requirement: Full sun to light shade
Water requirement: Low
Mature size: 6 to 48 inches tall with a 2-foot spread; can reach 5 to 7 feet tall when flowering
Learn more about growing ‘Karl Foerster’ feather reed grass
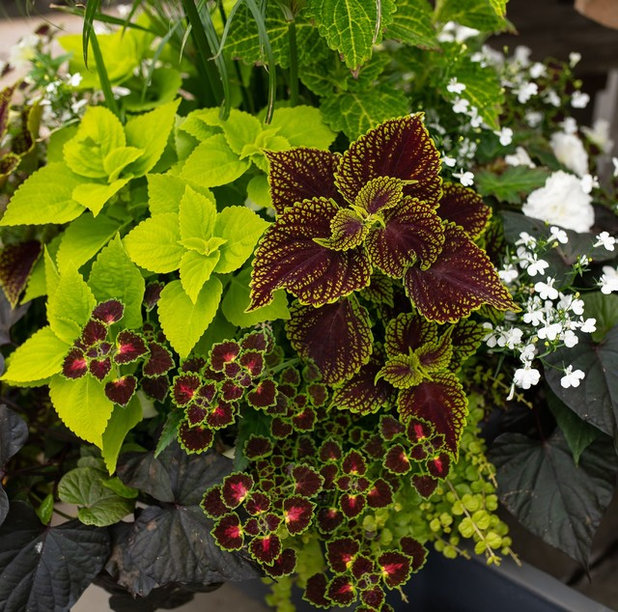
7. Coleus
(Solenostemon scutellarioides)
Sometimes all you need to do to have a new plant is cut off a stem from the original plant and add it to water. That’s the case with coleus, which will happily develop new roots in a water-filled jar.
Remove about 4 to 5 inches of a shoot. Strip the leaves off the bottom of the shoot and remove any flower buds. Place in water; check daily to be sure the water hasn’t evaporated or become dirty and add or replace water as needed. When the cutting has formed roots, move it to a container filled with potting mix.
Where it will grow: Hardy only in very mild climates; usually grown as a warm-season annual
Light requirement: Partial or full shade
Water requirement: Moderate to regular
Mature size: 8 to 36 inches or taller and equally wide, depending on variety

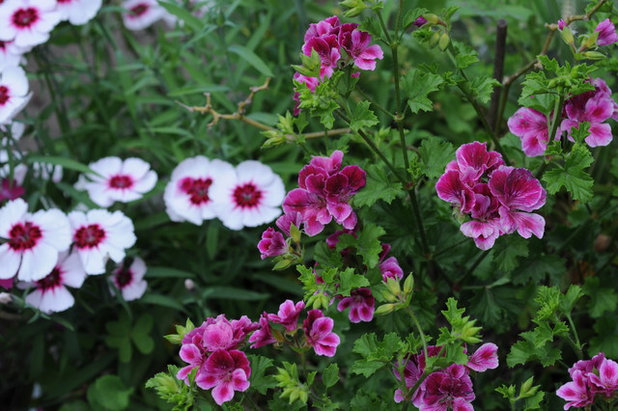
8. Common Geranium
(Pelargonium spp.)
Once you know how easy it is to root stem cuttings of geranium, you’re going to wonder why you’ve ever bought any in a nursery. After all, your neighbor probably is growing the perfect one just down the street. But while you can start a new plant simply by taking a small bit of stem, it’s only polite to at least ask before you cut.
Common geraniums will often readily root if you just stick a cutting into potting mix, but treating it as you would any other stem cutting can tip the odds even more in your favor.
Start with a stem cutting about 4 to 6 inches long. Try to cut at a 45-degree angle directly below a node (or swelling) or below a leaf. When it’s time to root the stem (do this as soon as possible), prepare a pot filled with a propagating mix and poke holes into it with a pencil or a chopstick.
Remove the lower leaves from the stem, dip about a quarter of the lower stem in rooting hormone and shake off any excess. Gently place the stem or stems in the prepared pot and firm the surrounding soil. Water well and cover the pot with plastic.
Keep the soil moist and provide ventilation, either with holes in the plastic or by removing the plastic for about 15 minutes every day. When the roots have formed, move them to a new container or into the ground.
Where it will grow: Grow as an annual or houseplant; hardy to 30 degrees Fahrenheit, or minus 1.1 degrees Celsius (zones 10 to 12)
Light requirement: Full to partial sun
Water requirement: Moderate to regular
Mature size: 6 to 36 inches tall and up to 2 feet wide
Where it will grow: Grow as an annual or houseplant; hardy to 30 degrees Fahrenheit, or minus 1.1 degrees Celsius (zones 10 to 12)
Light requirement: Full to partial sun
Water requirement: Moderate to regular
Mature size: 6 to 36 inches tall and up to 2 feet wide

9. Beardtongue
(Penstemon spp.)
Taking stem cuttings is one of the go-to ways for propagating plants, and beardtongue, or penstemon, is very easy to reproduce with this approach. Before you get started, it’s easiest to get a container filled with your propagating mix ready ahead of time. Poke holes in the mix for the cutting or cuttings using a pencil or a chopstick.
Start by cutting off a 3- to 5-inch stem just below a node (or swelling) or below a leaf or bud. Then remove the leaves from the lower half of the stem but keep at least three leaves on the top half. Dip the lower stem’s end in rooting hormone and shake off any excess. Add the stem to the propagating mix and firm it into place. Once you’ve added all the cuttings, water thoroughly and cover with plastic.
Keep the soil moist and provide ventilation, either with holes in the plastic or by removing the plastic for about 15 minutes every day. When the roots have formed, move them to a new container or into the ground.
Where it will grow: Hardy to minus 40 degrees Fahrenheit, or minus 40 degrees Celsius (zones 3 to 10)
Light requirement: Full to partial sun
Water requirement: Low to moderate for most
Mature size: 12 to 36 inches tall and 8 to 24 inches wide
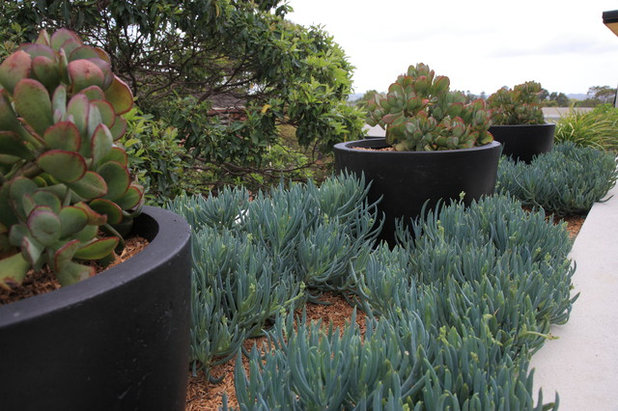
Jade plants in containers stand out in this raised succulent bed with Senecio serpens.
10. Jade plant
(Crassula spp.)
Jade plant is another one of those plants that will often easily form roots when a stem is just set into the soil. But if you can’t get a good stem to use, you can also propagate it by using a leaf cutting.
Prepare individual pots ahead of time with a propagating mix and create a 45-degree-angle hole near the center of each pot using a pencil or a chopstick. Then cut off a complete leaf that is healthy. Cut as close to the base of any stem as possible, then trim to 1 to 1½ inches long.
Dip the stem end of the cutting in rooting hormone, shake off any excess, and place the cutting in the hole. The leaf should be facing the outside of the pot.
Firm the soil gently around it. Water thoroughly and put the pot on a tray filled with water. Add a plastic cover as you would for stem cuttings.
Set the tray in a spot with bright, indirect light and treat it as you would stem cuttings. When new leaves form in the pot, fertilize with a water-soluble, quarter-strength fertilizer.
Where it will grow: Grow as an annual; hardy to 30 degrees Fahrenheit, or minus 1.1 degrees Celsius (zones 10 to 11)
Light requirement: Full sun
Water requirement: Low
Mature size: 1 to 8 feet tall and 1 to 3 feet wide
More on Houzz
How to Get More Plants for Free
How to Save Money on Succulents
Find more gardening guides
Work with a professional in your area
Shop for lawn and garden supplies
What are you working on?
Related Stories

Kitchen Guides
10 Key Kitchen Dimensions You Need to Know
Here are key kitchen dimensions that will help you design like a pro
Full Story

More Room Guides
35 Serene Puja Room Designs
Take a leaf out of these elegantly designed, beautiful prayer rooms on Houzz
Full Story

Decorating Guides
What Are the Benefits of Hiring an Interior Designer?
From furnishing working drawings to beautifying the home, find out how an interior designer plays multifunctional roles
Full Story
More Room Guides
Turn One Room Into Two With These Genius Ideas
Carve out an extra room within your home with these fab room-splitting tips and tricks
Full Story

Bedroom Guides
What Are the Ideal Wardrobe Measurements?
Here are dimensions for different types of wardrobe designs that ensure maximum functionality and storage
Full Story
Architecture
These Indian Homes Know How To Combat Harsh Climate
See how these homes by SPASM, Kumar Moorthy & Associates and JPLUSDARCHITECTS mitigate the ramifications of harsh climate ahead of time
Full Story
Architecture
How to Find an Architect That's Right for You
Make the construction and renovation of your home a pleasant and memorable journey by selecting the right architect
Full Story
Bathroom Guides
Step-by-Step: A Guide to Renovating Your Bathroom
Planning to renovate your bathroom? Learn about the different stages involved in the remodelling process
Full Story
Living Rooms
30 Best Sofa Designs
This guide gives a rundown of sofa types that will leave you spoilt for choices
Full Story
Small Spaces
7 Stylish Ways to Dry Your Laundry In a Small Apartment
Has your drying rack become a perpetual eyesore in your home? These dapper laundry drying solutions have you covered
Full Story
I'm surprised that DAY LILIES are missing! I have day lilies in my garden that were my great grandmothers and have just been divided and replanted. I have shared with others and they just come back every year after our harsh Canadian winters!
Also peonies, hostas, morning glories, marigolds, and nasturtium!
I had 6 plants that I planted in my flowerbed behind the house 20 yrs ago, and now I have enough that goes down both sides of my 280 ft fenceline😄. I have 100 yr old peonies from my grandmother's garden that I transplanted from her yard when she passed away. If you carefully transplant them, they will live for years. I made 8 plants from the original 3x4 ft plant.
Iris, beebalm, rudbeckia, native coreopsis, garden phlox and above all asters, all multiply quite happ for me, even after having given lots away last fall.