
Weekend DIYs to Spruce Up Your Living Room
Want to add a bit of creative flair to your living room in just a couple of days? It’s a doddle with these easy craft ideas

Weekends are for DIY, right? It’s a great feeling to take a day or two to get a job done well, and when it offers scope for your creativity, too, it’s especially satisfying. And the living room is the ideal space for a quick revamp. These easy, done-in-a-weekend projects will inspire you to get crafty and bring a very personal touch to your space.
Paint a piece of furniture
It’s surprising how much a quick change of colour to just one item can freshen up a room, as this eye-catching yellow chair demonstrates.
First, apply a wood or multi-surface primer to your piece of wooden furniture (use the multi-surface option if you’re painting over old paint), and leave it to dry. Once dry, sand it down so the paint will adhere to it, give it a dust and then slap on a few coats of paint. You can use an all-in-one primer paint if you want to skip the first few steps.
This is a great project to undertake on a sunny day out on the patio (but be sure to protect your patio with an old sheet).
Refresh your surfaces
This can take as little or as much time as you like, and it’s an easy and relaxing project in which to get lost.
Gather together your most beautiful vases, ornaments, small art sculptures and frames – any curios you’d like to put on display, or scour vintage shops, boutiques and websites to find new ones. Then spend time artfully arranging them on a suitable surface, such as a sideboard, mantelpiece, coffee table, shelf, side table or wide windowsill.
The secret is to pick an anchor object around which to arrange your items – the frame does the job here. A hero piece like this grounds the composition and brings everything together. Working with a limited colour palette can also help. Here, there are just four colour families: mustard, pale blue, cream and black.
Work from back to front, placing tall items at the back. Grouping pieces in odd numbers is also a good trick – try balancing pairs of objects with one other item.
Make some floor cushions
A chunky floor cushion will bring a cosy touch to a room and is a great use for old or cheap throws or even unwanted knitted jumpers patchworked together. You could knit or crochet the cover instead if you’re skilled with yarn.
To rework an old throw, simply fold it over, not quite in half, leaving a large flap. Whipstitch all the way around in a matching colour of thread to make an envelope, turning the edges under a little as you go. Next, fold the flap so it overlaps the cushion body and whipstitch it in place on the sides, leaving the top edge free. Finally, stuff it with old pillows or a large cushion pad.
Hang floating frames
Two shelves, family photos and artworks, and some imagination – that’s all you need to create a striking, home-made gallery like this. Once made, it also means you can swap around your art collection whenever you feel like it.
To make it especially easy, opt for a shelving kit from a DIY store, which will include the shelf and brackets; you’ll just need to provide the tools and muscle.
If you’re hanging your shelves on a solid brick or masonry wall, you’ll need red wall plugs (for 6mm to 10mm screws). For plasterboard and studwork walls, find the vertical studs in the wall and screw directly into these. If that’s tricky, use redi-drivers for plasterboard walls, or spring toggle or nylon toggle fixings. These are best for supporting weight.
Fashion a throw
Draping a smart new throw over an armchair is a simple way to add colour or pattern to your living room.
This is a fairly quick project if you can already knit or crochet and use a large hook or needles and a chunky yarn. However, you can also make a no-sew throw very easily using two sheets of fleece. It doesn’t fray, so it’s super-easy to work with.
Use one patterned and one plain fleece sheet, which your local haberdashery can cut to your desired size. Lay the sheets on top of each other and smooth out the wrinkles, making sure they’re exactly the same size. Trim if necessary.
Cut a 10cm x 10cm square at all four corners of the double fleece. Next, cut out 10cm strips along all fours sides at 2cm intervals to create fringing. Fold back each fringe strip at the 10cm mark and cut a small vertical slit into the middle of each fringe on the fold.
To join your two sheets together, pull the end of each fringe strip under and through its slit to create non-bulky knots all the way around. You’ll get a look like this blanket, only the fringe will be a bit chunkier.
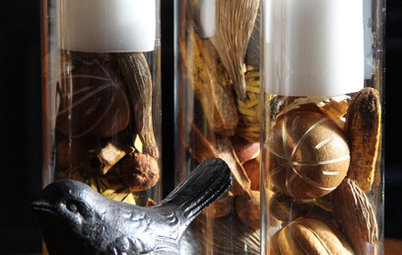
Dress up some antlers
Real antlers like these ones or the faux variety can easily be taken up a notch by adding crystals, as shown here. You can also try painting the antlers unusual colours, or draping strings of dainty woollen or felt pompoms or trims across them.
Be sure of your design before you take the plunge – try it out on a cardboard cut-out or some plastic antlers first before you make it permanent on the real thing.
If antlers aren’t quite your taste, decorate driftwood or branches instead. Wrap bands of colourful embroidery thread tightly around them, then mount them on a wall or display them on your mantelpiece.
Create a bespoke lampshade
The right lampshade is a quick and easy way to enhance the look of a room. There are lots of DIY kits available for making classic drum lampshades like this one and you’ll find them at craft shops, department stores and online.
Affordable and easy to use, the kit will usually contain a wire frame in two parts, tape, self-adhesive backing, clips to fasten your shade in place around the frame while you tape it and a rolled edge finishing tool to help you achieve a neat, professional look.
All you need to do is provide the fabric (or wallpaper, which will also work well). Go for something with a natural fibre content that isn’t stretchy for the best results – linen and cotton are ideal.
Pull together a pompom rug
Making a rug the size of the one shown in this room may be a touch ambitious, but it’s very easy to re-create this cosy look on a smaller scale.
You’ll need a non-slip rug mat to act as your base, plus lots of yarn, and you can cheat by using a pompom maker, available at craft shops. This inexpensive kit will save you a lot of time, and making pompoms with it is so satisfying – you don’t need to concentrate, so it’s an in-front-of-the-telly job, winding the yarn around and cutting it to create fluffy puffs of wool.
Use the tail of your pompom (it will become clear what part this is when you make one) to thread it through one of the holes in the rug mat, and tie it in place. Repeat the process, filling in the gaps with larger and smaller pompoms, until the whole mat is covered. It will feel amazing under your bare feet!
Find out the tricks to keep your home smelling fresh
Tell us:
Have you made, upcycled or styled anything that’s taking pride of place in your living room? Share your pictures and tips in the Comments below.


Making cushions is a good place to start if you’re new to stitching. If you don’t have a sewing machine, many sewing cafés and workshops will provide one, plus you’ll get expert guidance from the teacher there while you make your first stitches and snips.
Alternatively, go it alone and make a super-easy envelope-style cushion cover. It’s possible to sew it by hand, but it will take a bit longer than on a machine. Opt for a square or rectangular-shaped cover to start with.
Choosing your fabric is the fun bit, as you can play with colour combinations in your living room. Master sewing with lightweight cotton or upholstery fabrics first before you get adventurous with silks, heavier materials and anything with a lot of stretch. This is a great way to use up offcuts, old sheets and tired clothes and create something new.
Once you get the hang of running up a cushion cover or two, it’s a good way to ring the changes each season in your living room by adding a few different accent colours or patterns.